
“ Nginx-http-flv-module流媒体服务器搭建+模拟推流+flv.js在前端html和Vue中播放HTTP-FLV视频流 ”
场景
Windows上搭建Nginx RTMP服务器并使用FFmpeg实现本地视频推流 Windows上搭建Nginx RTMP服务器并使用FFmpeg实现本地视频推流_win nginx-rtmp最新版_霸道流氓气质的博客-CSDN博客 Vue中使用vue-video-player和videojs-flash插件实现播放rtmp视频文件流 Vue中使用vue-video-player和videojs-flash插件实现播放rtmp视频文件流_videojs-flash vue_霸道流氓气质的博客-CSDN博客 前面使用Vue播放RTMP流时,需要借助于flash。这种方式对于flash插件的安装 与后续浏览器支持等都不是很好。可以采用将rtmp的视频流转换成HTTP-FLV的方式, 然后前端通过bilibili的flv.js实现播放。
nginx-http-flv-module
nginx-http-flv-module: 基于nginx-rtmp-module的流媒体服务器。具备nginx-rtmp-module的所有功能,增加了HTTP-FLV,GOP缓存和VHOST一个IP对应多个域名的功能。Media streaming server based on nginx-rtmp-module. In addtion to the features nginx-rtmp-module provides, HTTP-FLV, GOP cache and VHOST (one IP for multi domain names) are supported now.
中文说明
nginx-http-flv-module/README.CN.md at master winshining/nginx-http-flv-module GitHub
一款基于 nginx-rtmp-module 的流媒体服务器。
nginx-http-flv-module 具备nginx-rtmp-module 的所有功能,并且对比如下
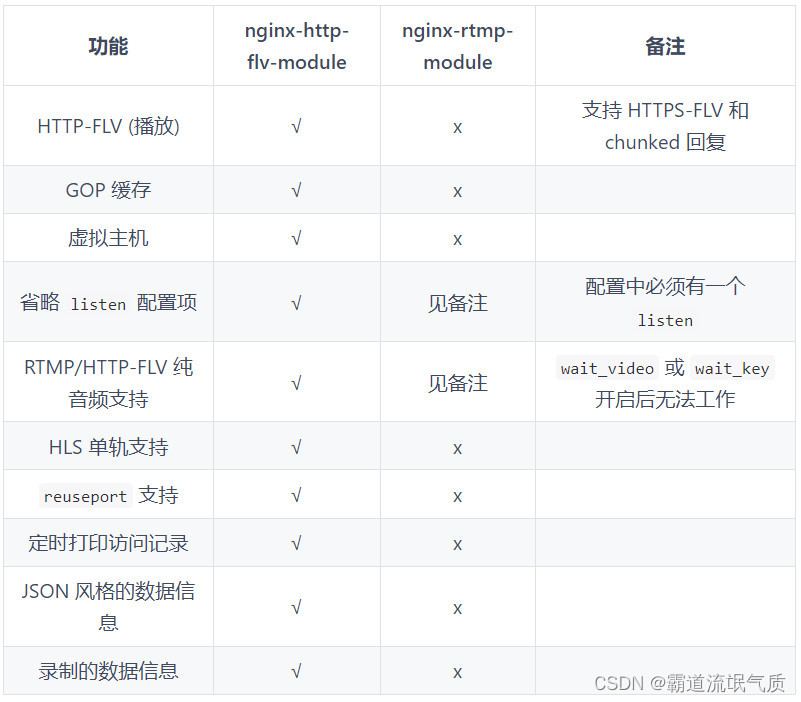
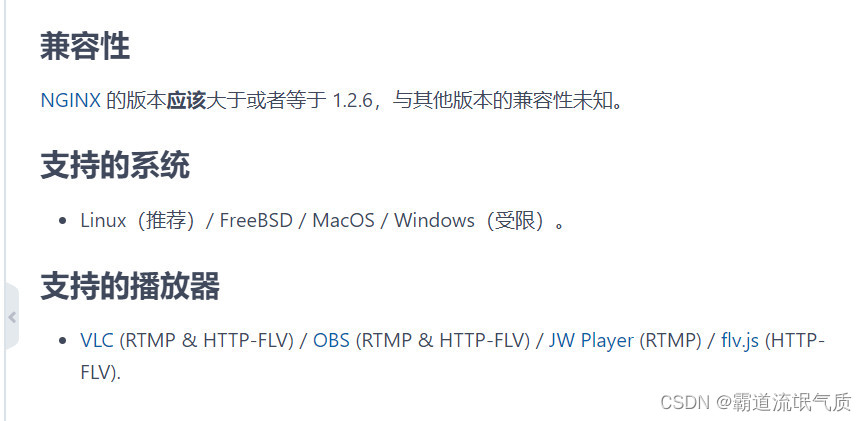
支持的播放器
VLC (RTMP & HTTP-FLV) / OBS (RTMP & HTTP-FLV) / JW Player (RTMP) / flv.js (HTTP-FLV).
注意事项
1、Adobe 将在 2020 年 12 月 31 日之后停止对 flash 播放器 的官方支持, 主流浏览器随后将移除 flash 播放器,使用 flash 播放器的插件将不再可用。 2、flv.js 只能运行在支持 Media Source Extensions 的浏览器上。 3、nginx-http-flv-module 包含了 nginx-rtmp-module 所有的功能, 所以不要将 nginx-http-flv-module 和 nginx-rtmp-module 一起编译。 4、如果使用 flv.js 播放流,那么请保证发布的流被正确编码, 因为 flv.js 只支持 H.264 编码的视频和 AAC/MP3 编码的音频。 5、其中的 add_header Access-Control-Allow-Origin * 与 add_header Access-Control-Allow-Credentials true 很重要, 主要解决了前端通过HTTP方式拉流是的跨域问题。 其他注意事项和详细细节可见官方github。 注 博客霸道流氓气质的博客_CSDN博客-C#,架构之路,SpringBoot领域博主
实现
1、官方示例以及推荐等都是在Linux服务器上。
 但是如果需要在本地Windows电脑上进行调试或者服务器就必须是Windows服务器的话,
需要编译Windows版本,或者直接网络上搜索下载已经编译好的Windows版本。
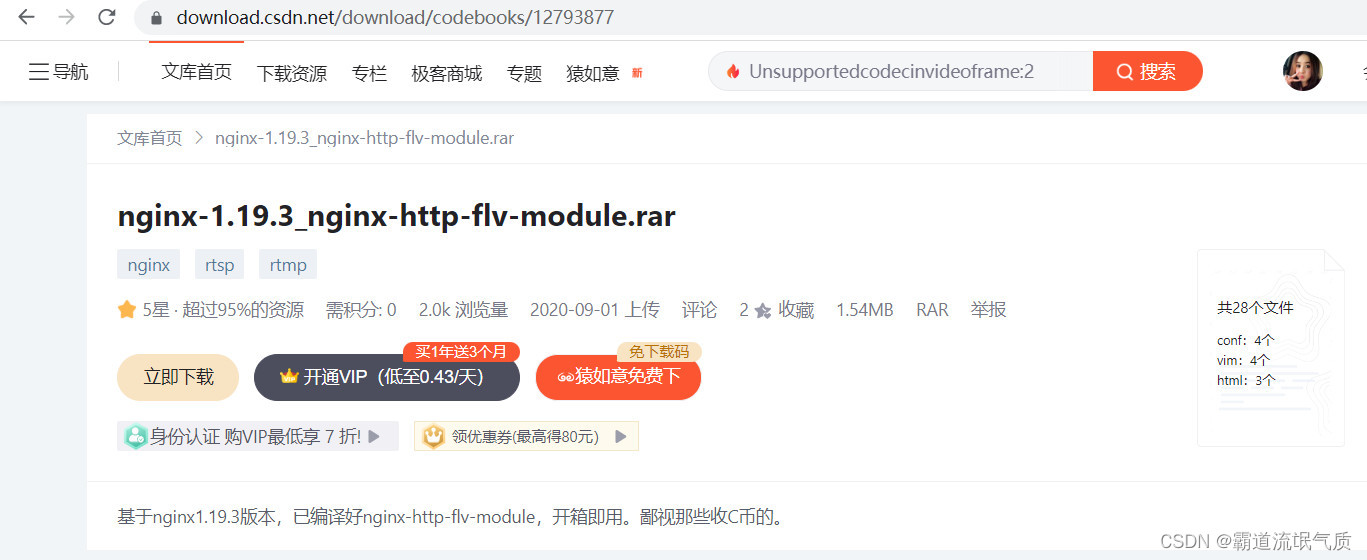
比如:
https://download.csdn.net/download/codebooks/12793877
但是如果需要在本地Windows电脑上进行调试或者服务器就必须是Windows服务器的话,
需要编译Windows版本,或者直接网络上搜索下载已经编译好的Windows版本。
比如:
https://download.csdn.net/download/codebooks/12793877
 但是是否可用需要自己下载验证。
以下载上面的为例,下载解压后,自带run.bat运行脚本
但是是否可用需要自己下载验证。
以下载上面的为例,下载解压后,自带run.bat运行脚本
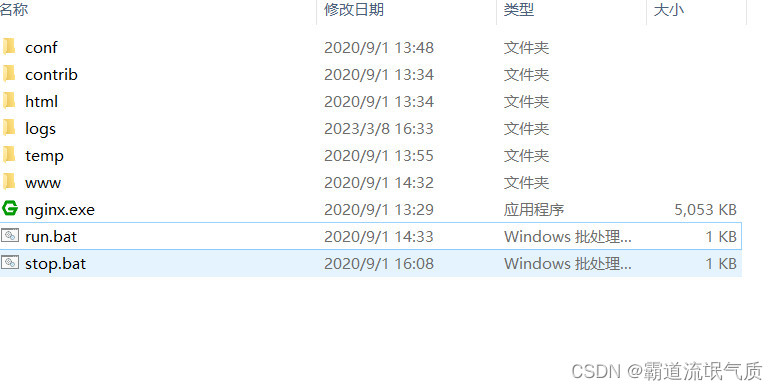 脚本内容为:
nginx.exe -c conf/http-flv.conf
这里是指定走配置文件conf/http-flv.conf 所以如果要修改的话也是修改http-flv.conf文件,而不是原来默认的nginx.conf文件了。 双击启动脚本启动后,可以从任务管理器中验证是否启动成功,或者通过其他查看日志等方式验证。 2、配置文件 关注两个地方,比如这里的官方例子 假设在 http 配置块中的 listen 配置项是
http {
 ...
 server {
 listen 8080; #不是默认的 80 端口
 ...
 location /live {
 flv_live on;
 }
 }
}
在 rtmp 配置块中的 listen 配置项是
rtmp {
 ...
 server {
 listen 1985; #不是默认的 1935 端口
 ...
 application myapp {
 live on;
 }
 }
}
并且发布的流的名称是 mystream,那么基于 HTTP 的播放 url 是
http://example.com:8080/live?port=1985&app=myapp&stream=mystream
下面附官方提示的配置文件示例
worker_processes 1; #运行在 Windows 上时,设置为 1,因为 Windows 不支持 Unix domain socket
#worker_processes auto; #1.3.8 和 1.2.5 以及之后的版本
#worker_cpu_affinity 0001 0010 0100 1000; #只能用于 FreeBSD 和 Linux
#worker_cpu_affinity auto; #1.9.10 以及之后的版本
error_log logs/error.log error;
#如果此模块被编译为动态模块并且要使用与 RTMP 相关的功
#能时,必须指定下面的配置项并且它必须位于 events 配置
#项之前,否则 NGINX 启动时不会加载此模块或者加载失败
#load_module modules/ngx_http_flv_live_module.so;
events {
 worker_connections 4096;
}
http {
 include mime.types;
 default_type application/octet-stream;
 keepalive_timeout 65;
 server {
 listen 80;
 location / {
 root /var/www;
 index index.html index.htm;
 }
 error_page 500 502 503 504 /50x.html;
 location = /50x.html {
 root html;
 }
 location /live {
 flv_live on; #打开 HTTP 播放 FLV 直播流功能
 chunked_transfer_encoding on; #支持 'Transfer-Encoding: chunked' 方式回复
 add_header 'Access-Control-Allow-Origin' '*'; #添加额外的 HTTP 头
 add_header 'Access-Control-Allow-Credentials' 'true'; #添加额外的 HTTP 头
 }
 location /hls {
 types {
 application/vnd.apple.mpegurl m3u8;
 video/mp2t ts;
 }
 root /tmp;
 add_header 'Cache-Control' 'no-cache';
 }
 location /dash {
 root /tmp;
 add_header 'Cache-Control' 'no-cache';
 }
 location /stat {
 #推流播放和录制统计数据的配置
 rtmp_stat all;
 rtmp_stat_stylesheet stat.xsl;
 }
 location /stat.xsl {
 root /var/www/rtmp; #指定 stat.xsl 的位置
 }
 #如果需要 JSON 风格的 stat, 不用指定 stat.xsl
 #但是需要指定一个新的配置项 rtmp_stat_format
 #location /stat {
 # rtmp_stat all;
 # rtmp_stat_format json;
 #}
 location /control {
 rtmp_control all; #rtmp 控制模块的配置
 }
 }
}
rtmp_auto_push on;
rtmp_auto_push_reconnect 1s;
rtmp_socket_dir /tmp;
rtmp {
 out_queue 4096;
 out_cork 8;
 max_streams 128;
 timeout 15s;
 drop_idle_publisher 15s;
 log_interval 5s; #log 模块在 access.log 中记录日志的间隔时间,对调试非常有用
 log_size 1m; #log 模块用来记录日志的缓冲区大小
 server {
 listen 1935;
 server_name www.test.*; #用于虚拟主机名后缀通配
 application myapp {
 live on;
 gop_cache on; #打开 GOP 缓存,减少首屏等待时间
 }
 application hls {
 live on;
 hls on;
 hls_path /tmp/hls;
 }
 application dash {
 live on;
 dash on;
 dash_path /tmp/dash;
 }
 }
 server {
 listen 1935;
 server_name *.test.com; #用于虚拟主机名前缀通配
 application myapp {
 live on;
 gop_cache on; #打开 GOP 缓存,减少首屏等待时间
 }
 }
 server {
 listen 1935;
 server_name www.test.com; #用于虚拟主机名完全匹配
 application myapp {
 live on;
 gop_cache on; #打开 GOP 缓存,减少首屏等待时间
 }
 }
}
然后上面下载的Windows编译版本的配置文件http-flv.conf的内容为
worker_processes 1;
error_log logs/error.log error;
events {
 worker_connections 4096;
}
http {
 include mime.types;
 default_type application/octet-stream;
 keepalive_timeout 65;
 server {
 listen 800;
 location / {
 root www;
 index index.html index.htm;
 }
 error_page 500 502 503 504 /50x.html;
 location = /50x.html {
 root html;
 }
 location /live {
 flv_live on; #打开HTTP播放FLV直播流功能
 chunked_transfer_encoding on; #支持'Transfer-Encoding: chunked'方式回复
 add_header 'Access-Control-Allow-Origin' '*'; #添加额外的HTTP头
 add_header 'Access-Control-Allow-Credentials' 'true'; #添加额外的HTTP头
 }
 location /hls {
 types {
 application/vnd.apple.mpegurl m3u8;
 video/mp2t ts;
 }
 root temp;
 add_header 'Cache-Control' 'no-cache';
 }
 location /dash {
 root temp;
 add_header 'Cache-Control' 'no-cache';
 }
 location /stat {
 #推流播放和录制统计数据的配置
 rtmp_stat all;
 rtmp_stat_stylesheet stat.xsl;
 }
 location /stat.xsl {
 root www/rtmp; #指定stat.xsl的位置
 }
 #如果需要JSON风格的stat, 不用指定stat.xsl
 #但是需要指定一个新的配置项rtmp_stat_format
 #location /stat {
 # rtmp_stat all;
 # rtmp_stat_format json;
 #}
 location /control {
 rtmp_control all; #rtmp控制模块的配置
 }
 }
}
rtmp_auto_push on;
rtmp_auto_push_reconnect 1s;
rtmp_socket_dir temp;
rtmp {
 out_queue 4096;
 out_cork 8;
 max_streams 128;
 timeout 15s;
 drop_idle_publisher 15s;
 log_interval 5s; #log模块在access.log中记录日志的间隔时间,对调试非常有用
 log_size 1m; #log模块用来记录日志的缓冲区大小
 server {
 listen 1935;
 #server_name www.test.*; #用于虚拟主机名后缀通配
server_name 127.0.0.1;
 application myapp {
 live on;
 gop_cache on; #打开GOP缓存,减少首屏等待时间
 }
 application hls {
 live on;
 hls on;
 hls_path temp/hls;
 }
 application dash {
 live on;
 dash on;
 dash_path temp/dash;
 }
 }
}
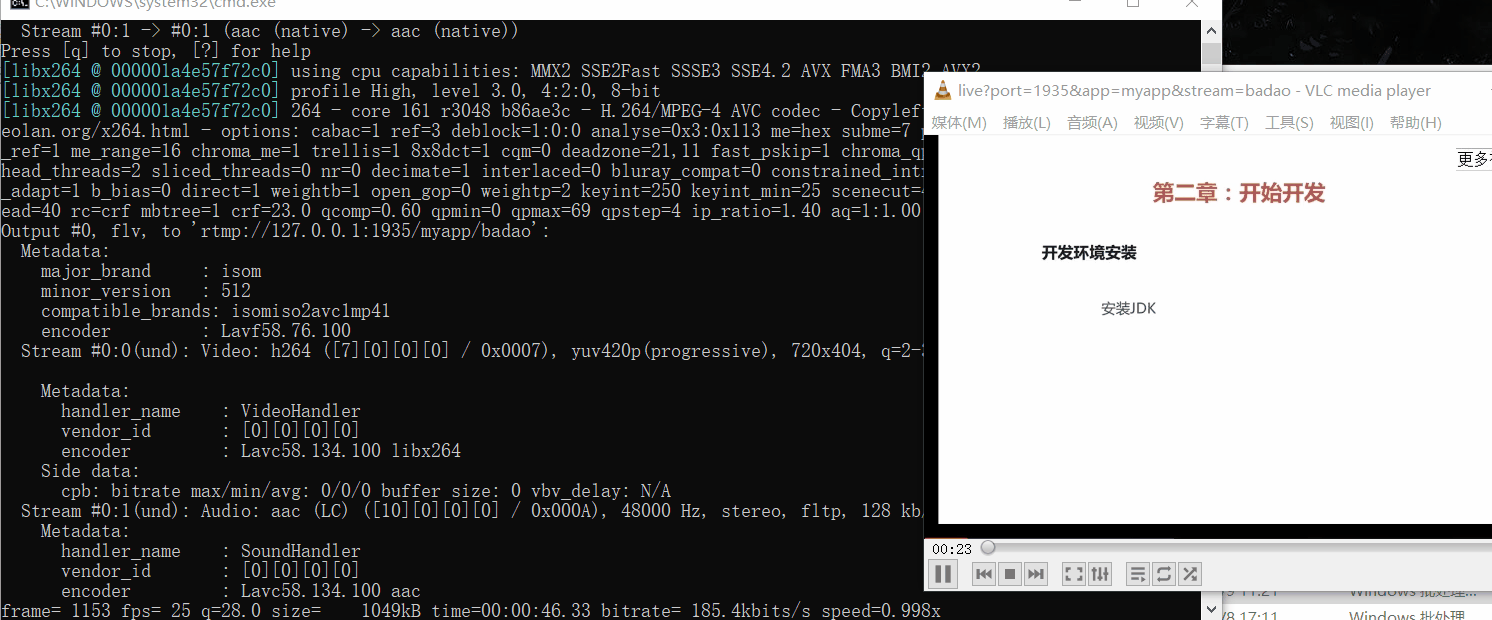
3、Windows上本地模拟推送RTMP视频流到nginx-http-flv-module 参考上面使用FFMpeg推送的流程,修改模拟推流bat脚本为
ffmpeg.exe -re -i D:\WorkSpace\Other\FFmpegDemo\test\1.mp4 -vcodec libx264 -acodec aac -f flv rtmp://127.0.0.1:1935/myapp/badao
pause
推流成功之后,使用VLC进行拉流测试,网络串流地址为
http://127.0.0.1:800/live?port=1935&app=myapp&stream=badao
注意这里的
800对应http配置的端口
live对应http配置的location后面的/live
port=1935对应rtmp中配置的端口
app=myapp对应的myapp是rtmp中配置的application myapp
stream=badao的badao是对应推流时的rtmp://127.0.0.1:1935/myapp/badao的badao
拉流推流效果。
 为了模拟时间延迟效果,可以使用其他推流工具,截图桌面时间显示进行推流,测试延迟效果。
Docker和docker-compose中部署nginx-rtmp实现流媒体服务与oob和ffmpeg推流测试
Docker和docker-compose中部署nginx-rtmp实现流媒体服务与oob和ffmpeg推流测试_docker 推流_霸道流氓气质的博客-CSDN博客
这里可以参考使用oob进行模拟推流测试效果
为了模拟时间延迟效果,可以使用其他推流工具,截图桌面时间显示进行推流,测试延迟效果。
Docker和docker-compose中部署nginx-rtmp实现流媒体服务与oob和ffmpeg推流测试
Docker和docker-compose中部署nginx-rtmp实现流媒体服务与oob和ffmpeg推流测试_docker 推流_霸道流氓气质的博客-CSDN博客
这里可以参考使用oob进行模拟推流测试效果
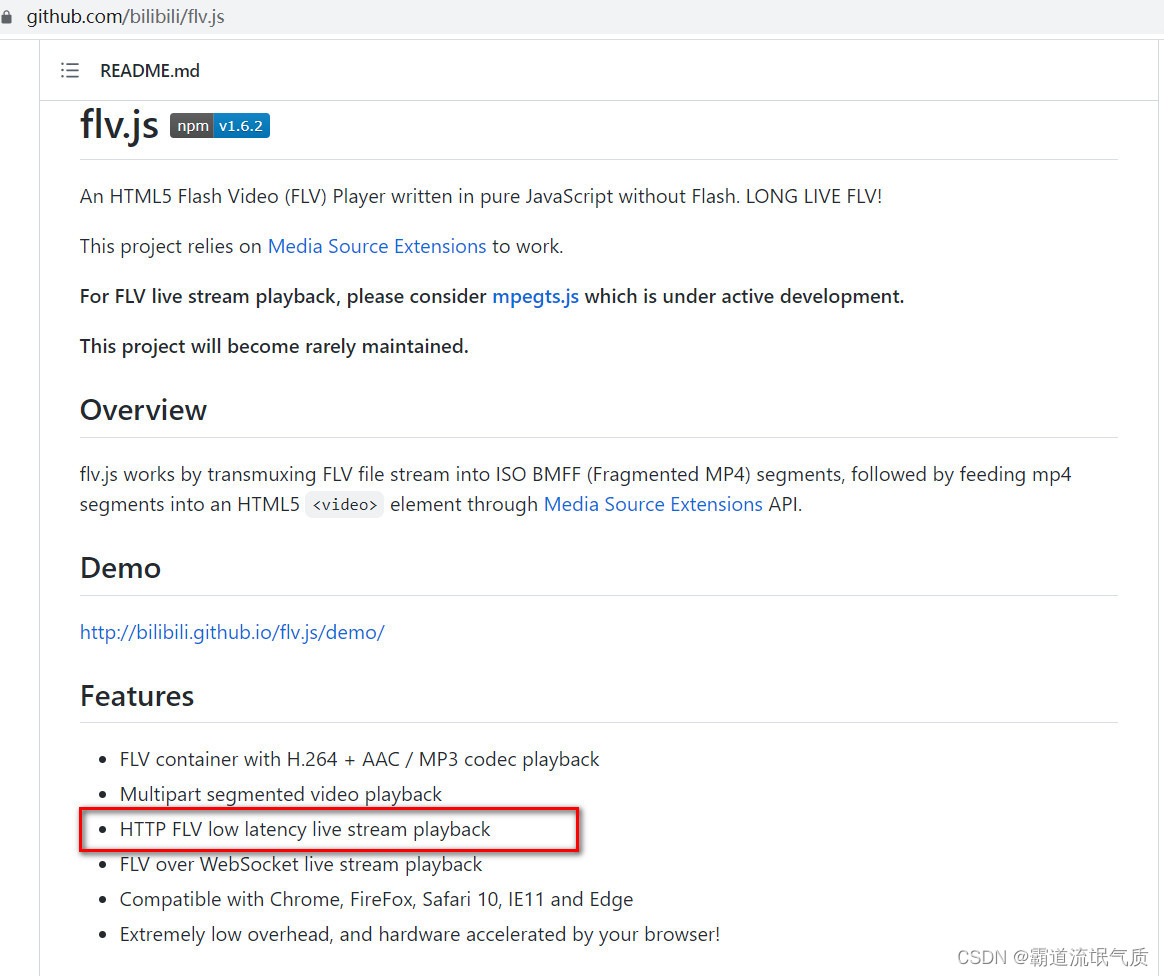
 4、bilibili的flv.js
GitHub - bilibili/flv.js: HTML5 FLV Player
可以看到其特点是
HTTP FLV低延迟实时流播放
4、bilibili的flv.js
GitHub - bilibili/flv.js: HTML5 FLV Player
可以看到其特点是
HTTP FLV低延迟实时流播放
 在html中使用flv.js播放http-flv
将flv.min.js下载到本地
https://github.com/bilibili/flv.js/releases/download/v1.5.0/flv.min.js
然后新建html
在html中使用flv.js播放http-flv
将flv.min.js下载到本地
https://github.com/bilibili/flv.js/releases/download/v1.5.0/flv.min.js
然后新建html
<!DOCTYPE html>
<html>
<head>
 <meta content="text/html; charset=utf-8" http-equiv="Content-Type">
 <title>flv.js demo</title>
 <style>
 .mainContainer {
 display: block;
 width: 1024px;
 margin-left: auto;
 margin-right: auto;
 }
 .urlInput {
 display: block;
 width: 100%;
 margin-left: auto;
 margin-right: auto;
 margin-top: 8px;
 margin-bottom: 8px;
 }
 .centeredVideo {
 display: block;
 width: 100%;
 height: 576px;
 margin-left: auto;
 margin-right: auto;
 margin-bottom: auto;
 }
 .controls {
 display: block;
 width: 100%;
 text-align: center;
 margin-left: auto;
 margin-right: auto;
 }
 </style>
</head>
<body>
<p class="mainContainer">
 <video name="videoElement" id="videoElement" class="centeredVideo" controls muted autoplay width="1024"
 height="576">
 Your browser is too old which doesn't support HTML5 video.
 </video>
</p>
<script src="js/flv.min.js"></script>
<script>
 function start() {
 if (flvjs.isSupported()) {
 var videoElement = document.getElementById('videoElement');
 var flvPlayer = flvjs.createPlayer({
 type: 'flv',
url:'http://127.0.0.1:800/live?port=1935&app=myapp&stream=badao'
 });
 flvPlayer.attachMediaElement(videoElement);
 flvPlayer.load();
 flvPlayer.play();
 }
 }
 document.addEventListener('DOMContentLoaded', function () {
 start();
 });
</script>
</body>
</html>
将url设置为上面的拉流地址,注意flv.min.js的路径
浏览器中访问该html看下效果
 5、在Vue中使用flv.js播放http-flv
安装依赖
5、在Vue中使用flv.js播放http-flv
安装依赖
npm install --save flv.js
新建页面修改代码
<template lang="html">
 <div id="app">
 <video
 id="videoLive"
 crossorigin="anonymous"
 controls
 autoplay
 width="100%"
 height="100%"
 style="object-fit: fill"
 ></video>
 </div>
</template>
<script>
import flvjs from "flv.js";
export default {
 name: "flvPlayer",
 data() {
 return {
 flvPlayer: null,
 };
 },
 mounted() {
this.createVideo('http://127.0.0.1:800/liveport=1935&app=myapp&stream=badao',"videoLive")
 },
 methods: {
 createVideo(url, elementId) {
 if (flvjs.isSupported()) {
 let videoElement = document.getElementById(elementId);
 this.flvPlayer = flvjs.createPlayer({
 type: "flv",
 enableWorker: true, //浏览器端开启flv.js的worker,多进程运行flv.js
 isLive: true, //直播模式
 hasAudio: false, //关闭音频
 hasVideo: true,
 stashInitialSize: 128,
 enableStashBuffer: true, //播放flv时,设置是否启用播放缓存,只在直播起作用。
 url: url,
 });
 this.flvPlayer.attachMediaElement(videoElement);
 this.flvPlayer.load();
 this.flvPlayer.play();
 }
 },
 },
};
</script>
<style lang="css">
</style>
运行查看效果

每日一言
"<!doctype html> <html lang="Zh-cn"> <head> <meta http-equiv="Content-Type" content="text/html; charset=utf-8" /> <meta name="robots" content="noindex,nofollow"> <meta name="viewport" content="width=device-width, initial-scale=1.0, maximum-scale=1.0, user-scalable=no"/> <meta name="renderer" content="webkit"> <title>您请求的文件不存在!</title> <link type="text/css" rel="stylesheet" href="https://www.oick.cn/css/404.css" /> <link rel="shortcut icon" href="http://www.oick.cn/favicon.ico" type="image/x-icon" /> </head> <body> <div id="wrap"> <div> <img src="https://www.oick.cn/imgs/404.png" alt="404" /> </div> <div id="text"> <strong> <span></span> <a href="javascript:history.back()">返回上一页</a> </strong> </div> </div> <div class="animate below"></div> <div class="animate above"></div> </body> </html>"